Compaction tests:
Compaction is the process of densification of soil particles by apply the external load.
Mainly two test are done in the laboratory for the compaction test.
- Standard proctor test
- Modified proctor test
- Standard proctor test:
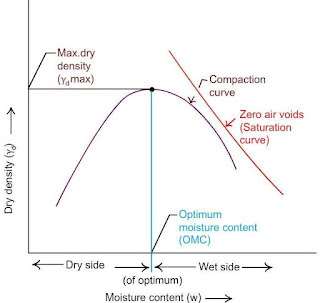
As we know that the degree of compaction is measured in terms of dry density. And dry density depends upon moisture content. The dry density is maximum at the Optimum moisture content. So for this test a curve is drawn between dry density and water content. Because by drawing this curve we can obtain the maximum dry density and also the OMC.
Apparatus Required for the test
- Compaction mould
- Hammer 2.6kg
- Collor 60mm
- Oven
- Detachable base plate
- Dessicator
- Spatula
- I.S seive, 4.75mm
- Weighting balance
- Calculator
The Proctor compaction mold and hammer is 101.6mm in diameter and 116.4mm in height. The inner volume is 944cm3. The height of fall of the hammer is 305mm
Procedure of the test:
- Take about 20kg of air-dried soil. Then Sieve it through 20mm and 4.7mm sieve.
- Calculate the percentage retained on 20mm sieve and 4.75mm sieve, and the percentage passing 4.75mm sieve.
- If the percentage retained on 4.75mm sieve is greater than 20, use the large mould of 150mm diameter. If it is less than 20%, the standard mould of 100mm diameter can be used. The following procedure is for the standard mould.
- Mix the soil retained on 4.75mm sieve and that passing 4.75mm sieve in proportions determined in step (2) to obtain about 16 to 18 kg of soil specimen.
- Clean and dry the mould and the base plate.
- Weigh the mould with the base plate to the nearest 1 gram.
- Take about 16 – 18 kg of soil specimen. Add water to it to bring the water content to about 4% if the soil is sandy and to about 8% if the soil is clayey.
- Keep the soil in an air-tight container for about 18 to 20 hours for maturing. Mix the soil thoroughly. Divide the processed soil into 6 to 8 parts.
- Attach the collar to the mould. Place the mould on a solid base.
- Take about 2.5kg of the processed soil, and hence place it in the mould in 3 equal layers. Take about one-third the quantity first, and compact it by giving 25 blows of the rammer. The blows should be uniformly distributed over the surface of each layer.
- The top surface of the first layer be scratched with spatula before placing the second layer. The second layer should also be compacted by 25 blows of rammer. Likewise, place the third layer and compact it.
- The amount of the soil used should be just sufficient to fill the mould ad leaving about 5 mm above the top of the mould to be struck off when the collar is removed.
- Remove the collar and trim off the excess soil projecting above the mould using a straight edge.
- Clean the base plate and the mould from outside. Weigh it to the nearest gram.
- Remove the soil from the mould..
- Take the soil samples for the water content determination from the top, middle and bottom portions. Determine the water content.
- Add about 3% of the water to a fresh portion of the processed soil, and repeat the steps ( 7 to 11)
Observations and Calculations
- Mass of empty mould with base plate
- Mass of mould, compacted soil and base plate
- Mass of compacted soil M = (mass of mould with b.plate) – (mass of mould, compacted soil and b.plate)
- Bulk Density = Mass / Volume
- Water content, w =
- Dry density = Bulk density / 1 + w
- Void ratio =

- Dry density at 100% saturation (theoretical) =

- Degree of saturation = w * G/ e X 100
Results:
From here we can get OMC and Maximum dry density by making the curve
- Get link
- X
- Other Apps
Labels
tests procedure
Labels:
tests procedure
- Get link
- X
- Other Apps


Comments
Post a Comment